A simple sensor reader app with Kotlin
Kotlin has become the official language for Android development. Let’s talk about creating a simple app to read sensor values on your Android.

Hello everyone!
Very recently, I was assigned to create a simple mobile app that can read sensor values on my phone. I am a very passionate React Native developer. That being said, my first choice was to use RN for this plus I had never used Kotlin before. Then I decided to create this simple app in Kotlin anyway, just to see what Kotlin is. I have used Android Studio to develop Android apps with Java a long time ago and even then, I remember that it took a lot of work even to create a simple single view app. Well, to my astonishment, Kotlin turned out to be a much simpler and easier replacement for Java. I never really liked Java anyway!
If you just want a glance at the source code, check out my GitHub! But if you stay with me, I promise you to teach you how to get started with Kotlin, even if you are a complete Kotlin beginner like me. We will create an extremely simple UI and then wire it up to show our sensor readings. One more thing. I used a real device to debug my app so it would be better if you too have an Android at hand. Or else we can always create a virtual device from Android Studio. I will explain how to simulate physical sensors with a virtual device.
Ingredients
To cook this app, you need to have,
- Android Studio installed
- An Android SDK installed. i.e. Android 9.0 (Pie)
- An Android device or a virtual device created with Android Studio
- Don’t worry about Kotlin’s syntax. It is pretty easy to catch up!
Got them all? Let’s dive in.
Development
Create a New Project
Open Android Studio and create a new project with an Empty Activity. Give it a proper name, and select Kotlin as the Language. Select API: 21 as the Minimum API level.

Then hit Finish.
Running the app
If you have an Android device, connect it to your computer and install the necessary drivers. Or let’s create an Android Virtual Device for now. Open the Device Manager from Tools → AVD manager.

Click the Create Virtual Device button.
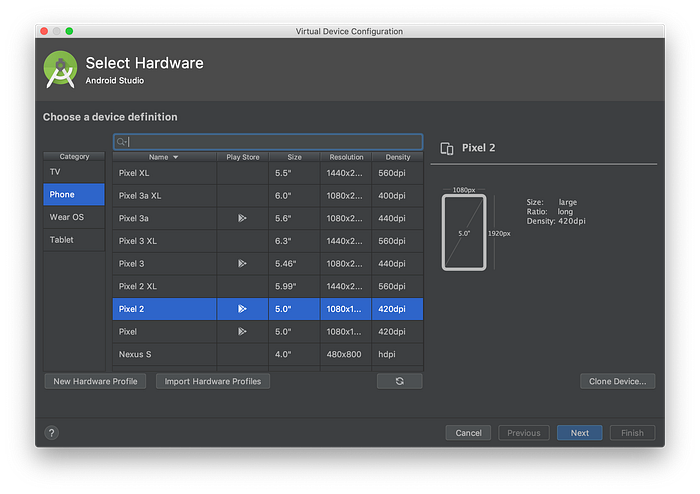
Select your preferred device. Pixel 2 looks good to me.
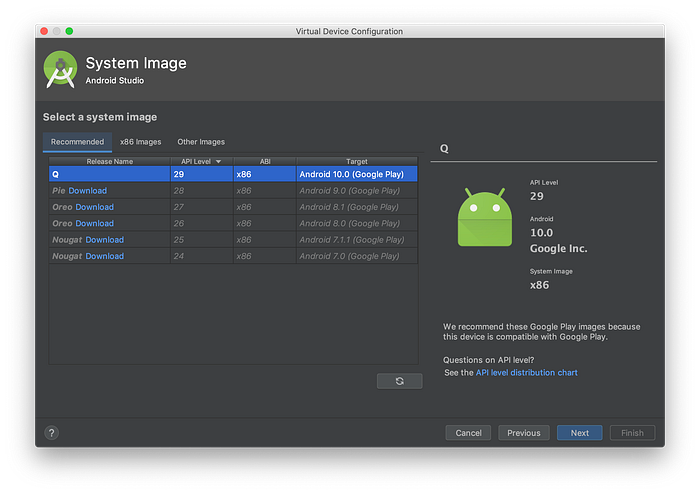
You may have to download an Android release to be installed on your virtual device. I have already downloaded Android Q. You may download any Android version (greater than Lollipop) that suits the hardware you selected.
When everything’s downloaded, hit Next and then Finish. We will leave the device’s name at its default.
Now you can install and run your new project just to check if everything’s been initialized properly. Hit the green Play button or press Ctrl + R.
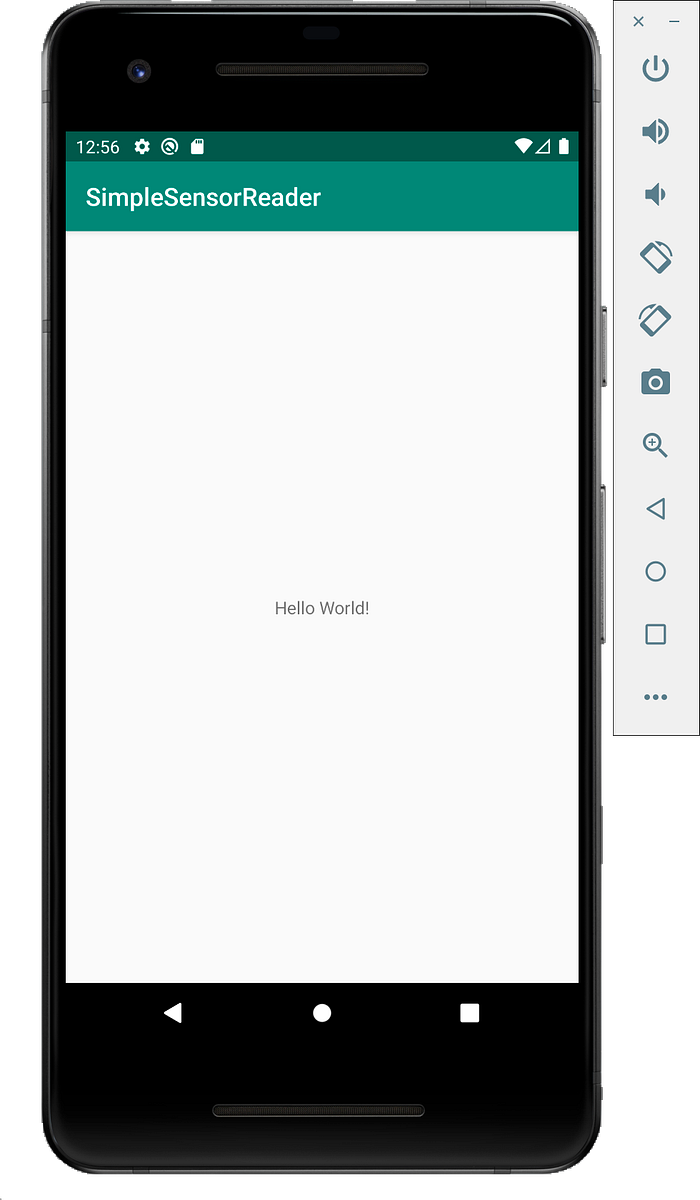
Here we have our app running on my virtual Pixel 2. It contains absolutely nothing but a Hello World message that Android Studio has placed for us when we created the new project.
The basic hardware buttons found on a physical Android device can be seen on the right side menu.
The … button at the bottom will open the device’s settings. Using these settings, we can simulate our sensor readings. We will come back to this when our app is finished.
Do not close the device until coding is complete. It is faster to debug the app if the virtual device is still running.
Creating a simple UI
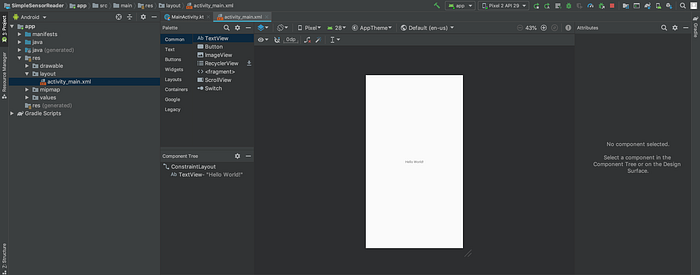
Open the app → res → layout → activity_main.xml file on Android Studio. These XML files are how Android Studio stores UIs. It follows an HTML-like syntax. The white area is what you see on your device screen when you open the app and it is called a View. Every UI component you put on this View gets added as XML code. You do not have to worry about the syntax because you can just drag and drop UI components onto the View and Android Studio will automatically generate the XML for you. You can switch between the rendered UI and actual XML code using the Design and Text tabs at the bottom.
We already have a TextView component with our “Hello World” text inside it. We will use the same component to display our sensor readings. Now drag and drop two Buttons from the pallet onto the View. Move up the TextView a little, then select it and from the Common Attributes menu to your right, set textAppearance to “ppCompact.Large”
Now select one of the buttons and you would see four blue circles on the rectangular border around the button. Click the left circle and drag it to the left edge of your View. Click the bottom circle and drag it to the bottom edge of your View.
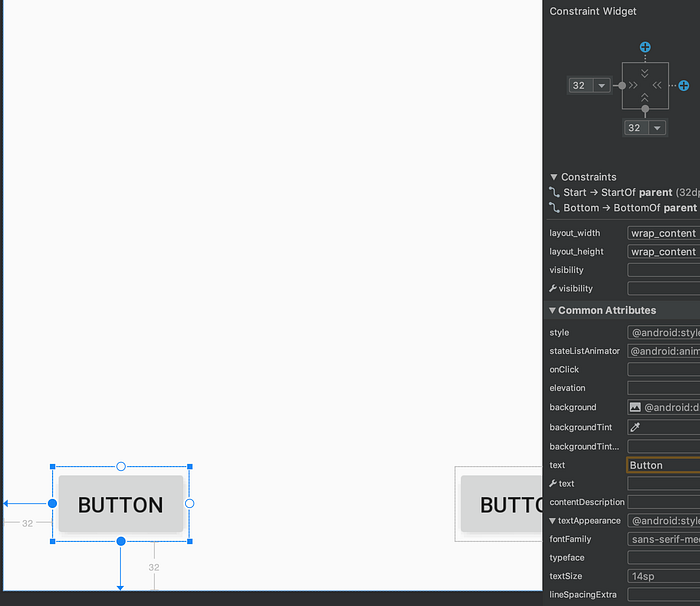
Those two circles will now turn blue. This is called constraining our UI components. The screen sizes of billions of Android devices on the planet are not the same. It is also impractical to generate separate UIs for every screen size. Instead, using constraints, we can make our app UI render somewhat similar on all the screen sizes. Android will take care of rendering right-sized UI components in the right position.
Now set the left and bottom constraint values to 32 using the Constraint Widget. See the above pic. This makes our left button always render 32 units to the right from the left edge of the screen and 32 units above from the bottom edge of the screen. Now constrain the right button appropriately.
Now switch the view to Text and open the XML code. You can see 3 main XML tags, one <TextView> and two <Button>s. We can edit how our components appear on the View by changing the XML too. Now change the “android:text” property of TextView and the two buttons to, “Click the start button”, “Start”, and “Stop” respectively. Also change the “android:id” values to “@+id/sensor_value”, “@+id/start” and “@+id/stop”. For now, our buttons don’t do anything and the text view does not show any sensor reading. To make them work, we need to wire up these UI components with some Kotlin code. And we use these id values to identify each component in our Kotlin code.
Making the UI work
Now open the app → java → com.yourname.yourprojectname → MainActivity.kt file on Android Studio. This is the entry point of our app. Android will look for this file when the app starts and it contains the MainActivity class which contains the main function onCreate. Android will execute the onCreate method when the app is launched, which will render the app’s initial view on the screen.
Before we start coding, goto Android Studio → Preferences and type in “unambiguous” on the search bar. Then tick the “Add unambiguous imports on the fly” option. This will come in handy when we are coding. Trust me! Click OK and go back to our main file.

Now what we need is a way to read the sensor values and display them on our TextView component. Android has a built-in interface called SensorEventListener which contains two abstract methods onAccuracyChanged and onSensorChanged. The first method is the callback function fired whenever the accuracy of any sensor is changed and the second method is the callback function fired whenever the value of any sensor is changed. We would receive the sensor data as callback parameters through the interface and it is up to us to implement these methods to do whatever we want.
Now add the SensorEventListener interface to our MainActivity class. As soon as we add the interface, Android Studio will show an error with a red underline under the class name, asking us to implement the abstract methods. Place your cursor on the underline and press Options + Return (Alt + Enter on Windows), then click Implement members from the pop-up menu.

Select both the functions from the next dialog and hit OK. Now the error should have been gone and your MainActivity.kt should look like this.
Android provides a service named “SENSOR_SERVICE” which can be used to distinguish many different sensors found on your device. Remember that our callback functions are fired whenever any sensor accuracy or value changes but we do not know the reading is from which sensor unless we filter out the data. So what we do is define a specific sensor type we want to read and check if the sensor reading is from the said sensor every time the callback is fired.
Now change your MainActivity to look like this.
We would want to access the sensor service and actual sensor type outside the main function so declare the variables on the global scope. We also need a resume variable that will be set by the Buttons and depending on its value, we update the sensor reading on the TextView. Until the start button is clicked, we don’t want the app to display the sensor reading so initialize the variable to false.
Then we initialize the remaining variables inside the main function. Get the SENSOR_SERVICE into mSensorManager variable using the getSystemService function and name it as a SensorManager (line #28). Then using the sensor manager we just initialized, let’s get the accelerometer sensor type into the mAccelerometer variable (line #30).
onSensorChanged()
Now let’s complete our onSensorChanged method. It gets called with a variable event of the type SensorEvent that carries the sensor’s type and readings. Inside the callback, we check whether the event is not null and resume variable is set and only so then we try to get the sensor reading.
As I mentioned above, this method is called for every sensor but we only want to read the accelerometer values. Lucky for us, the event variable also carries the sensor type so all we have to do is check if the type is of TYPE_ACCELEROMETER.
override fun onSensorChanged(event: SensorEvent?) {
    if (event != null && resume) {
        if (event.sensor.type == Sensor.TYPE_ACCELEROMETER) {
            findViewById<TextView>(R.id.sensor_value).text = event.values[0].toString()
        }
    }
}
The accelerometer returns 3 values, for the 3 physical dimensions. For now, let’s only read the value along the x-axis. findViewById method is used to identify UI components on our View using their ids. We type-safe the method to only look for <TextView> components. It’s just good practice. Make sure you cast the sensor reading value to a String to avoid crashes.
onAccuracyChanged()
For this simple app, I am not going to do anything if the sensor accuracy changes. Let’s just return from the method.
resumeReading() and pauseReading()
These are the two methods that get called when our two buttons are clicked. In the resumeReading method, set the resume variable and in the pauseReading method, unset the resume variable.
onResume() and onPause()
These two methods are 2 of Kotlin’s built-in callbacks. The prior gets fired when the user switches into our app and the latter gets fired when the user leaves our app (not necessarily exit but switch to another app). We do not want our app to continue reading the sensors when the user is not watching but we want the app to read the sensor values anytime the user comes back.
To tell the app to start listening to sensor reading changes (otherwise onSensorChanged() would never get invoked), we register an event listener on our sensor manager with our sensor type included in our onResume() and when the user switches away from our app, we unregister this event so the app would stop reading the sensor values.
You can register multiple listeners for different types of sensors following the same way.
override fun onResume() {
    super.onResume()
    mSensorManager.registerListener(this, mAccelerometer, SensorManager.SENSOR_DELAY_NORMAL)
}override fun onPause() {
    super.onPause()
    mSensorManager.unregisterListener(this)
}
Now our MainActivity.kt is complete. The only thing left to do is connect our two buttons to resumeReading() and pauseReading() methods. Your final main file would look like this.
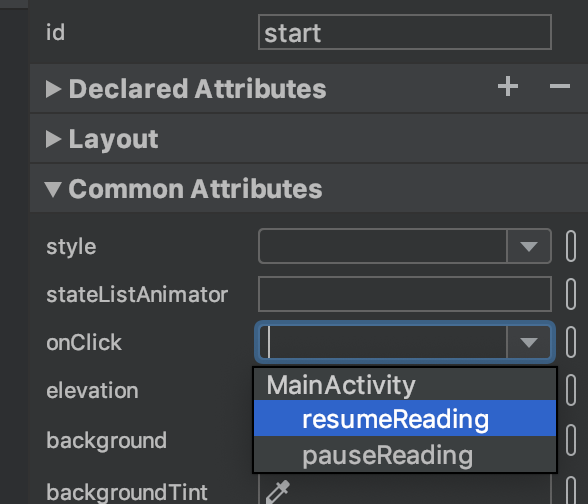
Now open your activity_main.xml file again and select the start button. From the Common Attributes menu, set the onClick property to resumeReading. Do the same for the stop button.
Now run your app again and switch to your virtual (or physical) device.
Testing
If you are using a physical device, you would see the sensor readings right away when you click the start button. If not, shake it up a little! What to do for virtual device owners?
Shake your computer!
Don’t! Remember how to open the virtual device’s settings? Then go to Virtual Sensors. Switch the radio button to Move. Click the start button on your app and then move the device picture inside the grey area around to see your TextView value change!

Conclusion
We only read a single sensor’s single value in this app. If you want to know how to make the app to read multiple sensors at once, please check the source code on my GitHub. See how easy it was to make a simple app with Kotlin? If you have any questions, leave them below and I will respond! For more interesting tech stories, have me subscribed! Until next time, goodbye!
PS: Claps are appreciated!